Commanding the Command Line
Series: Foundations of Digital Agency — Part 6 ← Part 5: Using the Terminal in VS Code → Part 7: On the Shoulders of Giants: Package Registries, Node & NPM
You may experience some emotions of trepidation when staring at the empty prompt in the terminal.
```bash-prompt
$
```
That is very normal for beginners. But I want you to rewrite the story you're telling yourself from:
> ❌ I am going to mess something up with this.
to:
> 🚀 I am going to take off with this.
The command line does have deep functionality -- but it also has basics, and they're not complicated. By the time you finish this article, you'll understand those basics, and you can start to find your flow in the command line. Now let's get into:
* **Bash** (your shell if you're on Windows or Linux)
* **Zsh** (your shell if you're on macOS)
Either way, in the [VS Code integrated terminal](http://pawper.dev/l/using-terminal-in-vs-code)!
## What does the command line do?
The command line allows you to interact with the operating system through the shell in your terminal.
## Why use the command line interface (CLI) instead of a graphical user interface (GUI)?
* It gives more control. There are things you can only do via the command line.
* Because typing is fast and you can also automate tasks, the command line is far quicker; the small gains in speed per task cumulate into a significant amount of efficiency.
* Compatibility; the command line will run on any machine, though [Windows requires additional setup if you want to use the Unix command line](http://pawper.dev/l/installing-wsl-windows-subsystem-linux). Cloud computing often requires the use of the command line. And, some AI tools are only available as CLIs.
## What am I looking at?
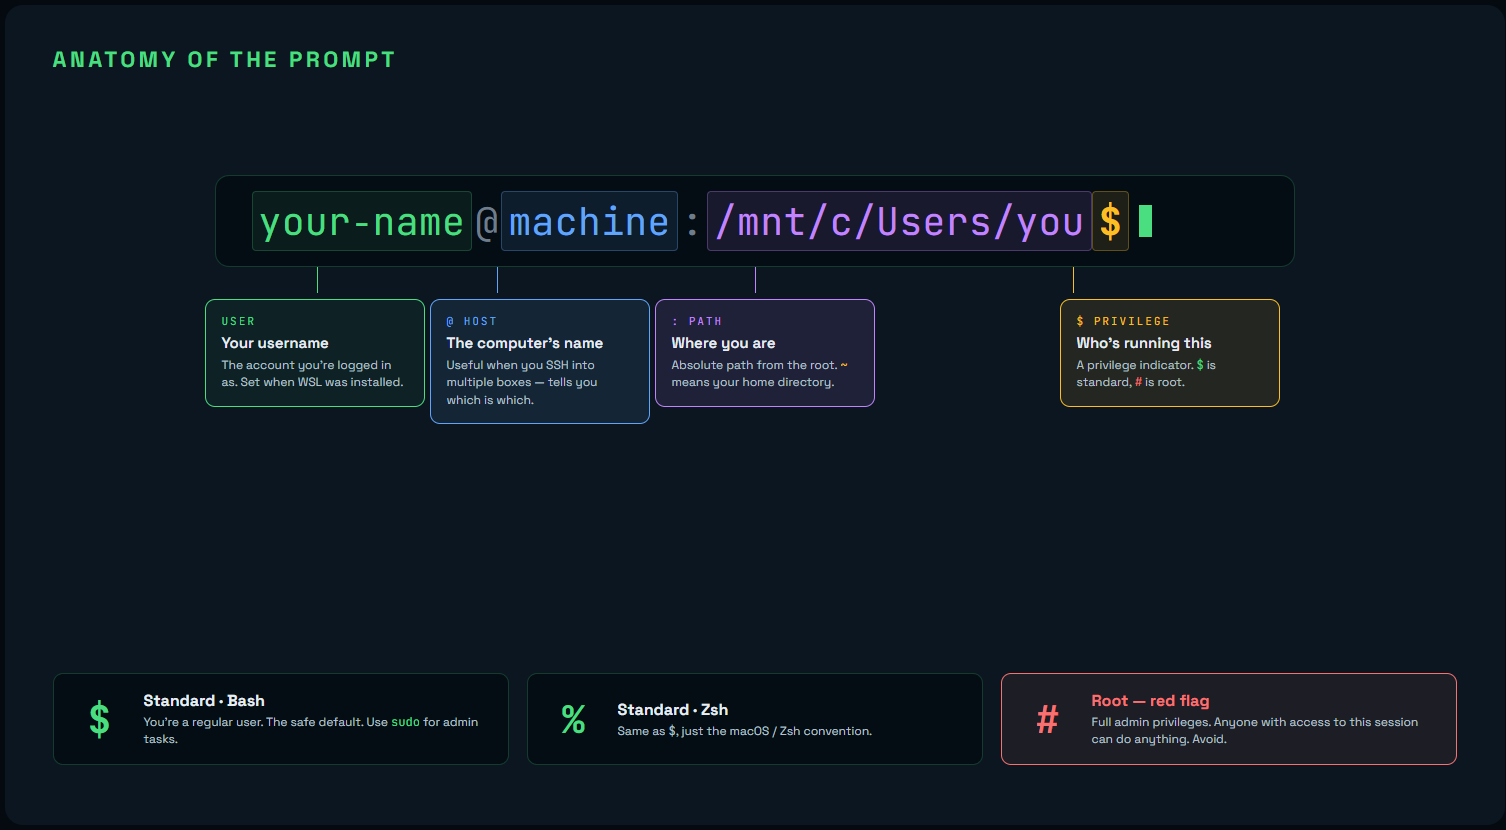
The first thing you see is the **prompt**. The default composition of the prompt is as follows:
```bash-prompt-key
currentuser@hostname:workingdirectoryUID
```
Your prompt should look something like this if on WSL:
```bash-prompt-key
your-name@machine-name:/mnt/c/Users/your-name$
```
And not much different on macOS:
```bash-prompt-key
your-name@machine-name ~ %
```
## What's `$`/`%`/`#` mean in the prompt? What's `sudo`?
Before we go any further we have to talk about **privileges**.
The prompt has a UID indicator to remind you if your privileges are standard (`$` - Bash; `%` - Zsh) or root (`#`). Root is not recommended. Anyone accessing your workstation (digitally or physically) could take advantage of or sabotage your system. If you see `#` in the prompt, you should take it as a red flag.
With standard privileges (`$`/`%`), you can temporarily gain administrative privileges by using the `sudo` command. `sudo` ("soo doo", short for "substitute user do") will prompt you for your user password, then for 5 minutes the Linux environment will run any command-line with the root privileges (in other words, all privileges). If you need to use `sudo` for a command, you will receive a message stating something like "Permission denied."
> Remember to store passwords securely.
> http://pawper.dev/l/guide-password-management-cybersecurity-beginners
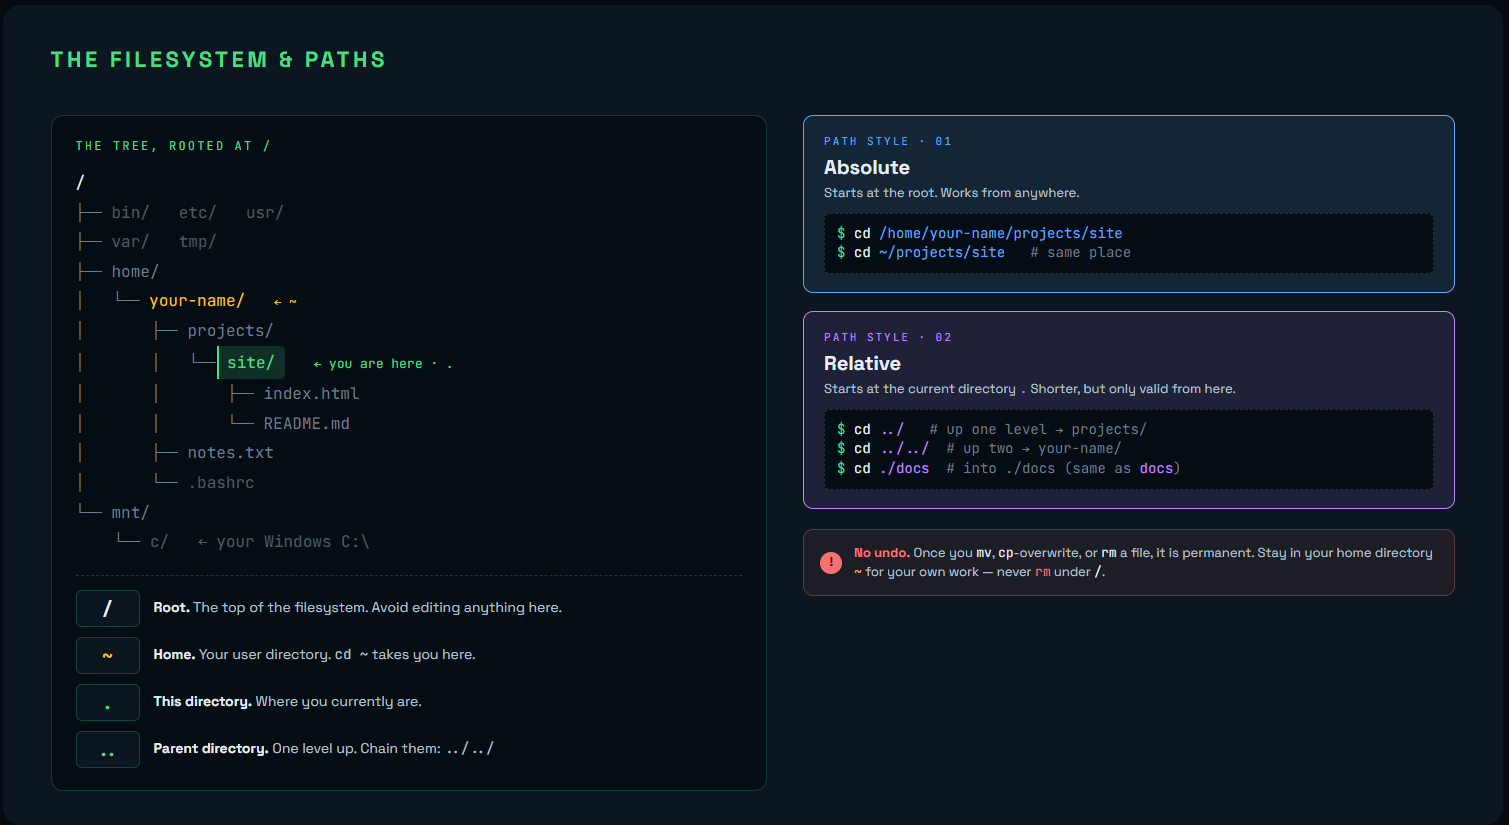
## What's `~`? Where am I?
Your prompt shows the absoltue path from the root directory.
Think of a path as instructions for how to navigate the file system. Every `/` (Bash/Zsh's path separator) is a going from a directory into one of its contents. If you've spent time on Windows, you may be used to `\` as the path separator, but you probably recognize `/` as a path separator from URLs on the Internet.
A path is an **absolute path** if it gives directions all the way from the root (the other kind of path is a relative path, but we'll return to that in a bit).
If you're in what's called the **home directory** for your user profile, you'll see `~`. In Bash/Zsh, home is represented by the metacharacter `~`, and if you use it in the CLI, the shell just sees it as the absolute path of your home directory. So you can always return home by entering `cd ~`! No ruby slippers required.
:::tabs
::tab[macOS]
Your home directory is at `/Users/your-name`. The `~` shortcut always works — `cd ~` takes you there from anywhere.
::tab[Windows]
If you're using WSL and in the mounted Windows filesystem, you'll see something like `/mnt/c/Users/your-name` in the prompt. Use `cd ~` to change to your home directory in Linux. Stay on the Linux side of the fence!
::tab[Linux]
Your home directory is at `/home/your-name`. The `~` shortcut always works — `cd ~` takes you there from anywhere.
:::
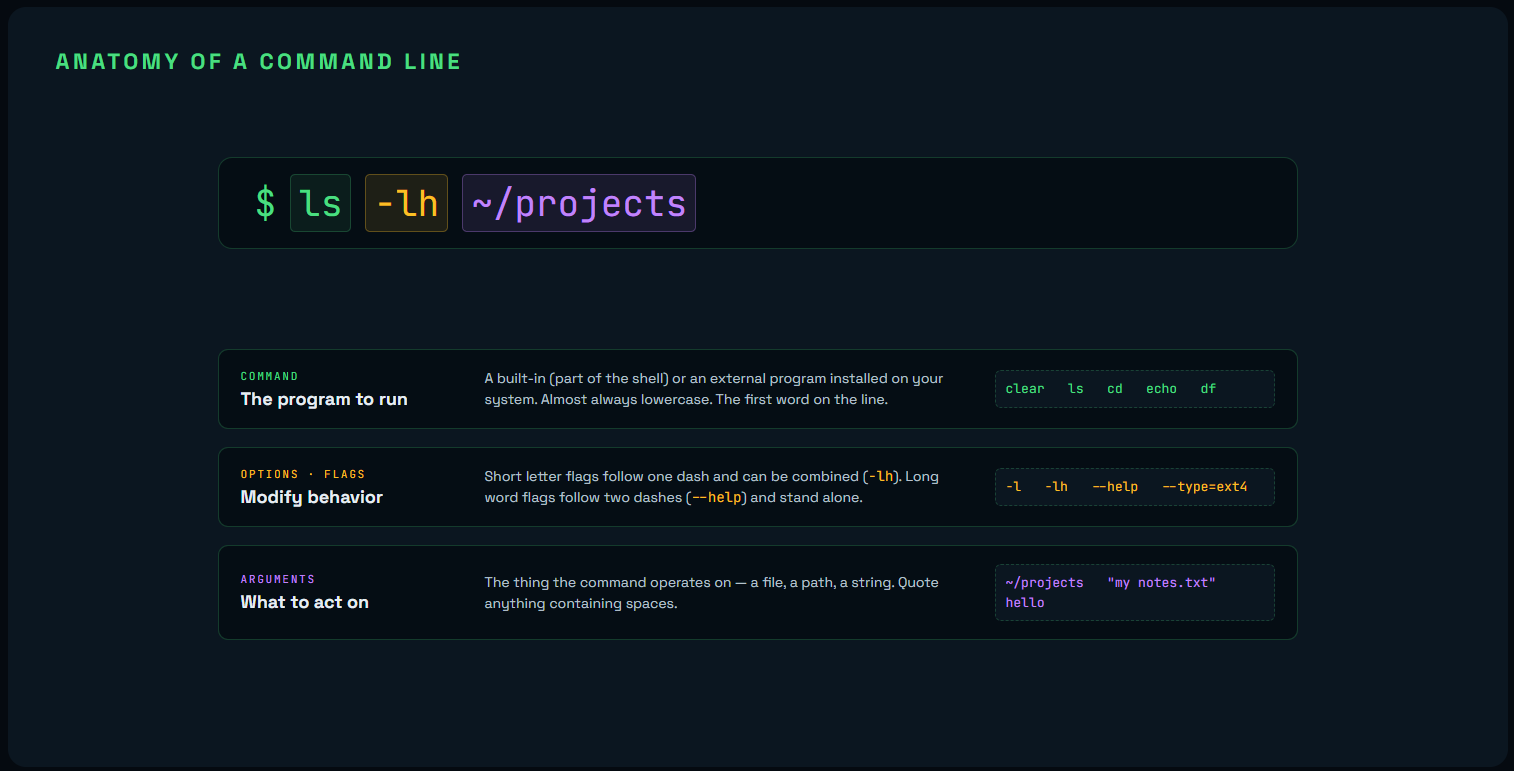
## What do I type here?
You can submit a **command-line** from the prompt. The general syntax is:
```bash
command -options arguments
```
Letter options follow a single dash and can be combined. For example, `-lh`. Word options follow two dashes, such as `--help`. Try the following commands as we go through them.
Some commands are just a command/utility name, such as `clear`.
```bash
clear
```
Others take arguments:
```bash
echo hello
```
Others accept letter options. Letter options are prefixed with a dash (`-`)
```bash
ls -lah
```
Some options might be longform word options (`--`) and can't be combined in the above way.
```bash
df --human-readable --total --type=ext4
```
If you want to learn what options and arguments a command takes, use the `--help` option:
```bash
ls --help
```
## Help, `--help` isn’t working!
External commands like `ls` are standalone programs and support `--help`:
```bash
ls --help
```
But **built-ins** like `history` are part of the shell itself (Bash/Zsh), not standalone executables. Use `help` instead:
```bash
help history
```
You can also use `info` or `man` for more detail:
```bash
info history
man history
```
You can check whether a command is a built-in or an external program using `type`:
```bash
type ls
type history
type type
```
## How do I navigate the filesystem?
When typing in the prompt, you can use absolute paths, but you'll usually use **relative paths**. Relative paths begin at the current directory, represented by `.`.
You can type `..` in the path to indicate a parent directory. So, `cd ../../..` goes up 3 times in the filesystem.
Note that Bash/Zsh are case-sensitive, and you'll need quotes around any paths with spaces in them.
### Understanding the Root Directory
You can start using `cd ..` now to change directory up, but you should know -- The **root directory** (represented as `/`) is the top-level of your entire filesystem—the foundation from which all other directories branch out. It contains system files, configuration, and installed software that makes your operating system run. You'll rarely need to navigate here for your own work, but understanding what's there helps you navigate confidently and avoid dangerous mistakes.
**⚠️ Caution:** Never delete or modify files in the root directory or its subdirectories unless you know exactly what you're doing. One wrong command with `rm` can break your entire system. Always stay in your home directory (`~`) for your work.
### Commands for Navigating & Working with the Filesystem
| Command | Description |
|---------|-------------|
| `pwd` | Print the working directory (where you are) |
| `mkdir -p <path>` | Create directories in the path(s) within the working directory |
| `cd <path>` | Change to the home directory (or specified path) |
| `ls <path>` | List the content of the working directory. Path is optional. |
| `file <file>` | Print what kind of file it is |
| `mv <source> <destination>` | Move `source` to `destination`; also used to rename files (e.g., `mv old.txt new.txt`) |
| `ln -s <path> <link>` | Create a symbolic link (nickname) for a file or directory |
| `cp <file1> <file2>` | Create a copy of `file1` named `file2` |
| `rm <file>` | Remove the file; use `-r` to remove directories recursively. **⚠️ No undo!** |
| `locate <x>` | Search for `x` in the shell’s filesystem database |
| `updatedb` | Update the database that `locate` uses |
| `pushd` / `popd` | Save your location (`pushd`); return to it (`popd`) |
| `code .` | Open the current directory in VS Code |
> **There is no undo. If you move, overwrite or delete a file or directory, it is a permanent change**.
## How do I make a new file?
| Command | Use When |
|---------|----------|
| `touch filename.txt` | You need a quick empty file |
| `echo "content" > filename.txt` | You want to create a file with text in one command |
| `cat > filename.txt` then type content, <kbd>Ctrl</kbd>+<kbd>D</kbd> to save, <kbd>Ctrl</kbd>+<kbd>C</kbd> to cancel | You want to type content interactively |
| `code newfile.txt` | You want to create and edit in VS Code |
### Naming files
Capitalization matters and you should only use alphanumeric characters, hyphens and underscores. Other special characters cause issues, as they have special meaning to the operating system. Also avoid spaces because they are problematic; they do work if you put the filename in quotes (`'my website'`).
### Extensions
A file can have a file type that doesn't match its extension and files technically work without an extension (however this is not recommended). Use the `file` command to determine the actual file type.
## How do I open / edit a file?
| Command | Purpose |
|---------|---------|
| `code filename.txt` | **Edit in VS Code** — Best use this. |
| `cat filename.txt` | **View file** (read-only, printed to your terminal) |
| `less filename.txt` | **Page through file** (read-only) — View a file page-by-page.<br /><kbd>Space</kbd> to scroll, <kbd>B</kbd> to go back, <kbd>Q</kbd> to quit. |
> **If you accidentally end up in a terminal text editor like nano or vim:**
> - **Nano:** Press <kbd>Ctrl</kbd>+<kbd>X</kbd> to exit (it will ask to save)
> - **Vim:** Press <kbd>Esc</kbd>, then type `:q!` (colon, q, exclamation) and press <kbd>Enter</kbd> to quit without saving
## Helpful Notes
* Bash is case-sensitive. Most of the time the command-line will be lowercase.
* Use <kbd>↑</kbd> / <kbd>↓</kbd> to cycle through previous submissions.
* You can enter a list of commands separated by `;` or `&&,` all in one command line.
* Enter `!!` (“bang bang”) to repeat the previous command line.
* Right click with your mouse to paste.
### Command Completion
If you start typing a command, directory or file name, you can use command completion (a.k.a. auto completion) with the <kbd>Tab</kbd> key to have the shell to guess where you are trying to get to. If it isn’t working because there are multiple possibilities, press <kbd>Tab</kbd> twice to see a list of conflicting files:\
`$ cd Do`<kbd>Tab</kbd> doesn’t autocomplete.\
`$ cd Do`<kbd>Tab</kbd><kbd>Tab</kbd> prints the conflicts:\
`Documents/ Downloads/`\
`$ cd Doc`<kbd>Tab</kbd> autocompletes to:\
`$ cd Documents/`
:::tabs
::tab[macOS]
To open the current directory in Finder:
```bash
open .
```
::tab[Windows]
`wslpath` is a CLI tool to convert Windows paths to Linux paths and vice-versa.
To open the current directory in Windows Explorer:
```bash
explorer.exe .
```
::tab[Linux]
To open the current directory in your file manager:
```bash
xdg-open .
```
Works across most desktop environments (GNOME, KDE, etc.). For GNOME specifically: `nautilus .`
:::
## Installing Software
You should first update your registry of packages:
```bash
sudo apt-get update
```
You'll usually use `sudo apt install`, then the name of the package:
```bash
sudo apt install tree
```
Then you can run the application:
```bash
tree .
```
## Beyond the Basics (Optional)
Once you're comfortable with the fundamentals above, you can explore:
- **Pipes (`|`)** — Chain commands together: `cat file.txt | grep “search term”` sends the output of one command into another
- **Redirection (`>`, `>>`)** — Save output to files: `ls > files.txt` writes directory listing to a file; `>>` appends
- **`grep`** — Search text: `grep “pattern” filename` finds lines matching a pattern
- **`find`** — Advanced searching: `find . -name “*.js”` finds all JavaScript files recursively
- **`sed` / `awk`** — Text processing and manipulation for advanced workflows
These tools unlock the real power of the command line, but they're not essential for getting started. Master the basics first, then explore these as you need them.
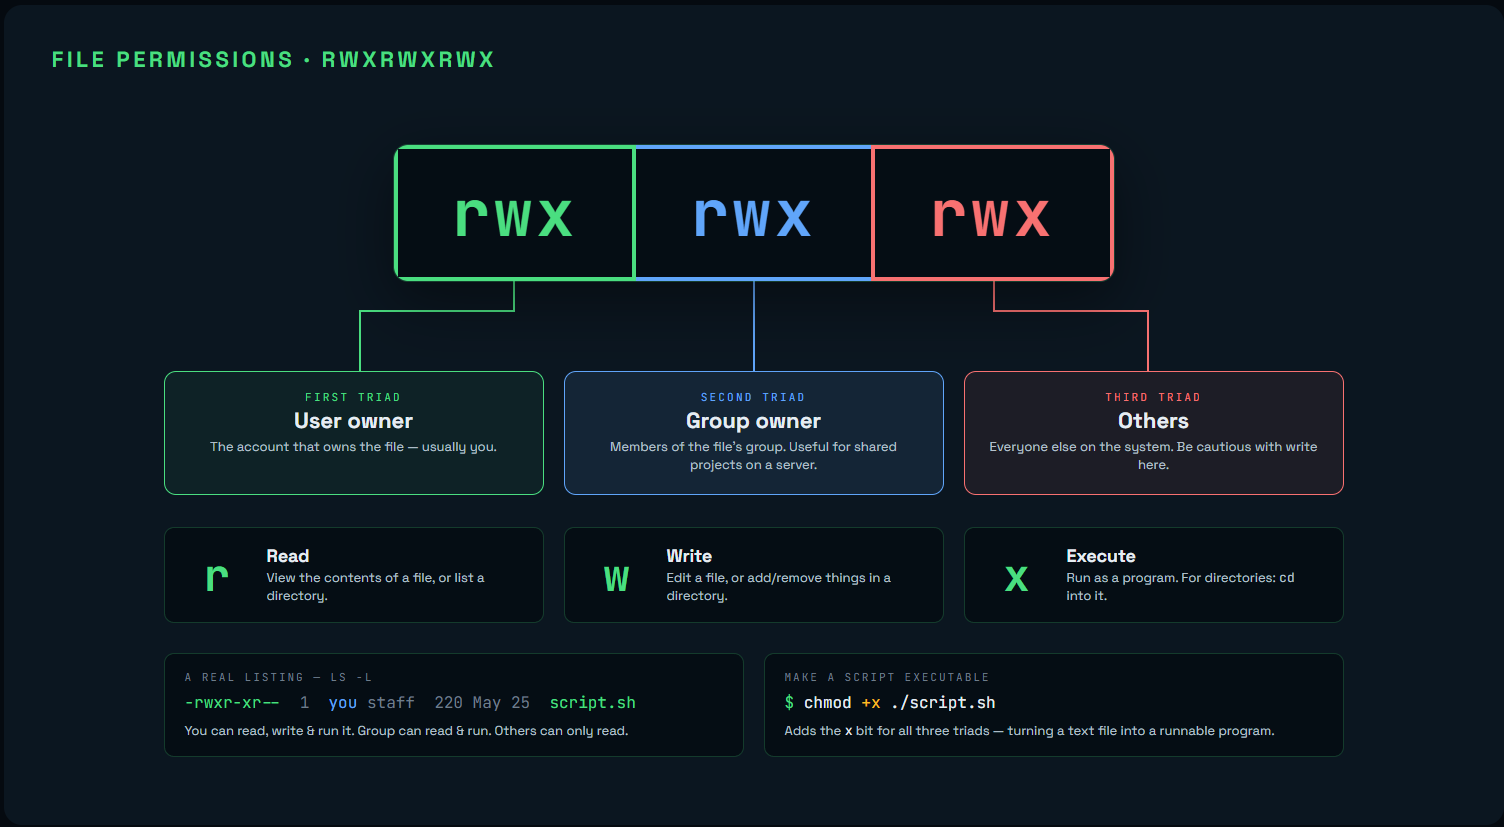
### Permissions
You can see files’ permissions using the `ls` command with the long format argument (`-l`). They are represented within a string of characters and dashes at the beginning of a file’s line.
```
drwxr-xr-x 2 user user 4096 Jan 9 10:11 documents
-rw-r--r-- 1 user user 675 Jan 7 12:05 .profile
```
* The first character indicates if the file is a directory or file. A `d` indicates it is a directory. A `-` indicates it is a file and is not a directory. The next 9 characters are the permissions.
* Every file or directory belongs to a user owner and a group owner. Then there are other people. Files can be readable (`r`), writeable (`w`) and/or executable (`x`) for each, in that order. If you see a `-` where one of these characters should be, that means the owner, group or public does not have that permission.
* `chmod` changes the mode/permissions of a file. You can optionally specify who for by using the corresponding letter for the owning user (`u`), owning group (`g`), and others (`o`). Use `+` to add a permission or `-` to remove it. Then follow that with the applicable permission(s): `r`, `w` and/or `x`. E.g., `chmod +x file` (adds executable permission for all) or `chmod go-w file` (removes write permission for the owning group and others).
## Customize Your Prompt
When you open Bash/Zsh in VS Code, your prompt might look like:
```bash-prompt
user@computer:/path/to/project$
```
You can customize this by editing your shell config file (in your home directory):
:::tabs
::tab[macOS]
Open your zsh config:
```bash
code ~/.zshrc
```
Add this near the bottom for a simple, colorful prompt:
```zsh
export PROMPT="%F{cyan}→%f "
```
Or a prompt showing the current directory:
```zsh
export PROMPT="%F{green}%~%f %F{cyan}→%f "
```
Save with <kbd>⌘</kbd>+<kbd>S</kbd>. Reload:
```bash
source ~/.zshrc
```
::tab[Windows]
Open your bash config:
```bash
code ~/.bashrc
```
Add this near the bottom for a simple, colorful prompt:
```bash
export PS1="\[\033[1;36m\]→\[\033[0m\] "
```
Or a prompt showing the current directory:
```bash
export PS1="\[\033[1;32m\]\w\[\033[0m\] \[\033[1;36m\]→\[\033[0m\] "
```
Save with <kbd>Ctrl</kbd>+<kbd>S</kbd>. Reload:
```bash
source ~/.bashrc
```
::tab[Linux]
Open your bash (or zsh) config:
```bash
code ~/.bashrc
```
(Use `~/.zshrc` if you're on zsh.)
Add this near the bottom for a simple, colorful prompt:
```bash
export PS1="\[\033[1;36m\]→\[\033[0m\] "
```
Or a prompt showing the current directory:
```bash
export PS1="\[\033[1;32m\]\w\[\033[0m\] \[\033[1;36m\]→\[\033[0m\] "
```
Save with <kbd>Ctrl</kbd>+<kbd>S</kbd>. Reload:
```bash
source ~/.bashrc
```
:::
### Prompt Key
:::tabs
::tab[macOS]
Use these variables to build your zsh prompt (`PROMPT`):
| Variable | What It Shows | Recommendation |
|----------|---------------|-----------------|
| `%n` | Current username | ✓ Keep it |
| `%m` | Hostname (computer name) | ✓ Keep it (useful for Docker) |
| `%~` | Full path, abbreviated with `~` | ✓ Recommended |
| `%1~` | Base name of current directory only | Consider (cleaner display) |
| `%T` | Current time (24-hour) | Optional |
| `%#` | Shows `#` if root user, otherwise `%` | ✓ Keep it (security indicator) |
Colors use `%F{color}text%f`. Named colors: `red`, `green`, `yellow`, `blue`, `magenta`, `cyan`, `white`.
**Example:** `%F{cyan}→%f` makes the arrow cyan.
::tab[Windows]
Use these variables to build your bash prompt (`PS1`):
| Variable | What It Shows | Recommendation |
|----------|---------------|-----------------|
| `\u` | Current username | ✓ Keep it |
| `\h` | Hostname (computer name) | ✓ Keep it (useful for Docker) |
| `\w` | Full path of current directory | Consider switching to `\W` |
| `\W` | Base name of current directory only | ✓ Recommended (cleaner display) |
| `\@` | Current time (12-hour am/pm format) | Optional |
| `\$` | Shows `#` if root user, otherwise `$` | ✓ Keep it (security indicator) |
Colors use `\[\033[X;Ym\]` where `X;Y` is the code below. **Example:** `\[\033[1;36m\]→\[\033[0m\]` makes the arrow bright cyan.
| Color | Code | | Color | Code |
|-------|------|---|-------|------|
| Black | `0;30` | | Dark Gray | `1;30` |
| Red | `0;31` | | Light Red | `1;31` |
| Green | `0;32` | | Light Green | `1;32` |
| Brown | `0;33` | | Yellow | `1;33` |
| Blue | `0;34` | | Light Blue | `1;34` |
| Purple | `0;35` | | Light Purple | `1;35` |
| Cyan | `0;36` | | Light Cyan | `1;36` |
| Light Gray | `0;37` | | White | `1;37` |
::tab[Linux]
Use these variables to build your bash prompt (`PS1`):
| Variable | What It Shows | Recommendation |
|----------|---------------|-----------------|
| `\u` | Current username | ✓ Keep it |
| `\h` | Hostname (computer name) | ✓ Keep it (useful for Docker) |
| `\w` | Full path of current directory | Consider switching to `\W` |
| `\W` | Base name of current directory only | ✓ Recommended (cleaner display) |
| `\@` | Current time (12-hour am/pm format) | Optional |
| `\$` | Shows `#` if root user, otherwise `$` | ✓ Keep it (security indicator) |
Colors use `\[\033[X;Ym\]` where `X;Y` is the code below. **Example:** `\[\033[1;36m\]→\[\033[0m\]` makes the arrow bright cyan.
| Color | Code | | Color | Code |
|-------|------|---|-------|------|
| Black | `0;30` | | Dark Gray | `1;30` |
| Red | `0;31` | | Light Red | `1;31` |
| Green | `0;32` | | Light Green | `1;32` |
| Brown | `0;33` | | Yellow | `1;33` |
| Blue | `0;34` | | Light Blue | `1;34` |
| Purple | `0;35` | | Light Purple | `1;35` |
| Cyan | `0;36` | | Light Cyan | `1;36` |
| Light Gray | `0;37` | | White | `1;37` |
:::
**Note:** Not all terminals support all colors. If using a terminal outside of VS Code, test and adjust if needed.
## Troubleshooting
### How to Escape Terminal Apps
If you're stuck in a terminal application (like a text editor, pager, or hung process), here are the universal ways to escape:
| Keyboard Shortcut | What It Does |
|------------------|--------------|
| <kbd>Ctrl</kbd>+<kbd>C</kbd> | **Interrupt/Cancel** — Stops the current process. Works in most apps. |
| <kbd>Ctrl</kbd>+<kbd>D</kbd> | **Exit** — Signals end-of-file. Closes some apps like `cat` in input mode. |
| <kbd>Q</kbd> | **Quit** — Works in pagers like `less` and `man`. Just press Q. |
| <kbd>Ctrl</kbd>+<kbd>Z</kbd> | **Suspend** — Pauses the app and returns to prompt (type `fg` to resume, `bg` to run in background). |
| <kbd>Esc</kbd> then `:q!` | **Vim exit** — Press Esc, type `:q!`, press Enter to force-quit without saving. |
| <kbd>Ctrl</kbd>+<kbd>X</kbd> | **Nano exit** — Exits to prompt (asks if you want to save). |
**If nothing works:** Try <kbd>Ctrl</kbd>+<kbd>C</kbd> first. If that hangs, try <kbd>Ctrl</kbd>+<kbd>Z</kbd>. In VS Code's terminal, you can also close the terminal tab directly.
### Permissions Denied When Running Scripts
If you ever get a bash script, and you can't run it, use `chmod +x`:
```bash
chmod +x ./script.sh
./script.sh
```
The `chmod +x` command makes the script executable.
---
You are now in command of the command line. You can navigate the filesystem, manipulate files, run programs, and understand what's happening under the hood. That empty prompt that felt intimidating at the beginning? You know what to do with it now.
> **Sources / additional material:**
>
> https://code.visualstudio.com/docs/editor/command-line
*This article was revised & expanded with AI for the purpose of providing practical information. I have reviewed it for accuracy and edited it appropriately.*